Contents
- Problem
- Solution
- Implementation
- Demo
- The Command
- The Query
- The Synchronization
- Setting up Kafka
- Testing the Synchronization
- Advantages
- Disadvantages
- Further Notes
- Github links
Problem:
Let’s say you run a large scale ecommerce store.
You have a large user base who query your system for products much more than they buy them.
In other words , your system has more read requests than write requests.
And so you would like to handle the high load of read requests separately than the relatively low write requests.
Also let’s say you need to write complex queries to read data and do this on the same database you write to and this might impact its performance.
Also let’s say you want to add additional security while writing data to the database.
How do you design your system to cater these specific use cases.
Solution:
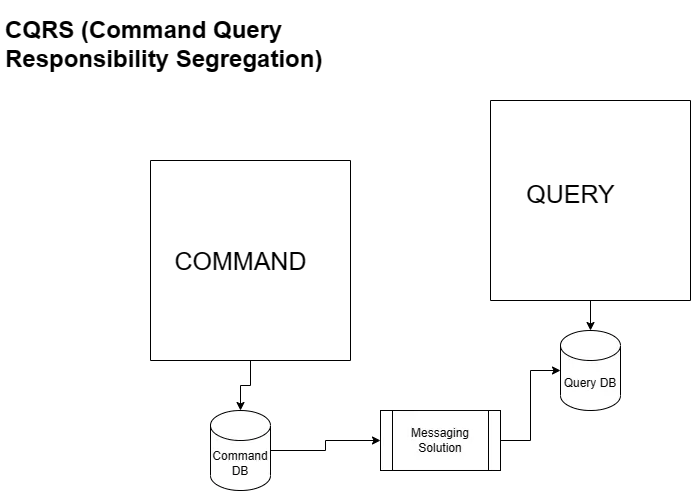
CQRS (Command Query Responsibility Segregation) design pattern addresses these concerns.
On a high level , you separate your read system from your write system and keep the two in sync.
Here is a diagram explaining the same:

Implementation:
To implement CQRS , you separate the command logic and the read logic.
You can create two different microservices for each.
One of them can be used to write data to the system.
In our ecommerce case we can use that microservice to store orders,products etc.
The other can be used to read data from the system.
In our ecommerce case we can use that to browse products etc.
Both of them will use their own databases.
These should be kept in sync through a messaging system like Apache Kafka.
Demo:
Now let’s see how to implement this design pattern in Spring Boot.
Let’s create two microservices.
One for the Command part to write data.
Another for the Query part to read data.
We can scale these microservices independently as per the load requirements.
For this example,
We will just take one use case of storing a product in the system (Command).
And another use case of reading all the products from the system (Query).
Notice that Command can contain additional security, business validations etc before writing data to the database.
And Query can handle complex queries.
THE COMMAND
Here are the steps to create the “Command” microservice.
STEP 1: Create a Spring Boot project with following dependencies:
<dependency>
    <groupId>org.springframework.boot</groupId>
    <artifactId>spring-boot-starter-web</artifactId>
</dependency>

<dependency>
    <groupId>org.springframework.boot</groupId>
    <artifactId>spring-boot-starter-data-jpa</artifactId>
</dependency>

<dependency>
    <groupId>com.h2database</groupId>
    <artifactId>h2</artifactId>
    <scope>runtime</scope>
</dependency>
We are using in memory database in this example , in real world scenarios this would be a database like PostGreSQL , Oracle , Dynamo DB etc.
STEP 2: Create an entity class for your data model:
package com.cqrs.command.demo;

import jakarta.persistence.Entity;
import jakarta.persistence.GeneratedValue;
import jakarta.persistence.GenerationType;
import jakarta.persistence.Id;

@Entity
public class Product {
    @Id
    @GeneratedValue(strategy = GenerationType.AUTO)
    private Long id;
    private String name;
    private String description;
    private double price;
    public Long getId() {
        return id;
    }
    public void setId(Long id) {
        this.id = id;
    }
    public String getName() {
        return name;
    }
    public void setName(String name) {
        this.name = name;
    }
    public String getDescription() {
        return description;
    }
    public void setDescription(String description) {
        this.description = description;
    }
    public double getPrice() {
        return price;
    }
    public void setPrice(double price) {
        this.price = price;
    }

}
STEP3: Create a repository for the above entity:
public interface ProductRepository extends JpaRepository<Product, Long> {}
STEP4: Create a REST Controller to add new products
@RestController
@RequestMapping("/products")
public class ProductCommandController {
    private final ProductRepository repository;

    public ProductCommandController(ProductRepository repository) {
        this.repository = repository;
    }

    @PostMapping
    public ResponseEntity<Product> createProduct(@RequestBody Product product) {
        repository.save(product);
      return ResponseEntity.ok().body(product);
    }
}
STEP 5: Start the Command microservice

STEP 6: Test the API :

Our Command Microservice is ready, almost.
THE QUERY
Now let’s create our Query Microservice.
STEP 1: Create a Spring Boot project with following dependencies:
<dependency>
    <groupId>org.springframework.boot</groupId>
    <artifactId>spring-boot-starter-web</artifactId>
</dependency>

<dependency>
    <groupId>org.springframework.boot</groupId>
    <artifactId>spring-boot-starter-data-jpa</artifactId>
</dependency>

<dependency>
    <groupId>com.h2database</groupId>
    <artifactId>h2</artifactId>
    <scope>runtime</scope>
</dependency>
We are using a relational in memory database here.
Again, in real world this could be a production grade relational database like PostGreSQL , Oracle or a NoSQL database like DynamoDB. It is a common practice that the read model is represented by a NoSQL database.
For this example though we will go with H2 database
STEP 2: Create a Enity class for our data model:
@Entity
public class Product {

    @Id
    private Long id;
    private String name;
    private String description;
    private double price;
    // getters and setters
}
STEP 3: Create a repository for the entity:
public interface ProductRepository extends JpaRepository<Product, Long> {}
STEP 4: Create a REST Controller to retrieve products:
@RestController
@RequestMapping("/products")
public class ProductQueryController {
    private final ProductRepository repository;

    public ProductQueryController(ProductRepository repository) {
        this.repository = repository;
    }

    @GetMapping
    public List<Product> getProducts() {
        return repository.findAll().stream()
                .collect(Collectors.toList());
    }
}
STEP 6: Start the Query Microservice.
Let’s configure a different port for the Query microservice (8081) in application.properties:
server.port=8081
and then start the app:

STEP 7: Test the app

There are no records of course, as our command and query microservices are not in sync. They use their own databases.
Let’s implement the synchronization.
THE SYNCHRONIZATION
To sync the data from command microservice to query microservice, we need to use a messaging solution like Apache Kafka.
Whenever a product is added we can trigger an event with the product details in Apache Kafka on the “Command” microservice end.
And then on the “Query” microservice end listen to that event.
Then retrieve the product from the event and store it in Query database.
When user queries for the products, return these products.
Here is the modified version with the synchronization changes.
COMMAND Changes:
STEP 1: Add apache kafka dependency:
<dependency>
    <groupId>org.springframework.kafka</groupId>
    <artifactId>spring-kafka</artifactId>
</dependency>
STEP 2: Configure Apache Kafka in application.properties:
spring.kafka.bootstrap-servers=localhost:9092
spring.kafka.consumer.group-id=products-group
spring.kafka.producer.key-serializer=org.apache.kafka.common.serialization.StringSerializer
spring.kafka.producer.value-serializer=org.springframework.kafka.support.serializer.JsonSerializer
Here,
spring.kafka.bootstrap-servers indicate the server and port on which Kafka runs
spring.kafka.consumer.group-id indicates the group identifier under which Kafka sends the product created event
spring.kafka.producer.key-serializer and spring.kafka.producer.value-serializer are used to serialize the key and value of the event data sent by Kafka .
STEP 3: Create a Product Event class:
package com.cqrs.command.demo;

public class ProductEvent {

    ProductEvent(String type,Product product){

        this.type = type;
        this.product = product;
    }
    private String type;
    private Product product;
    public String getType() {
        return type;
    }
    public void setType(String type) {
        this.type = type;
    }
    public Product getProduct() {
        return product;
    }
    public void setProduct(Product product) {
        this.product = product;
    }

}
STEP 4: Modify ProductCommandController class to include event logic:
package com.cqrs.command.demo;

import java.net.URI;

import org.springframework.beans.factory.annotation.Value;
import org.springframework.http.ResponseEntity;
import org.springframework.kafka.core.KafkaTemplate;
import org.springframework.web.bind.annotation.PostMapping;
import org.springframework.web.bind.annotation.RequestBody;
import org.springframework.web.bind.annotation.RequestMapping;
import org.springframework.web.bind.annotation.RestController;

@RestController
@RequestMapping("/products")
public class ProductCommandController {
    private final ProductRepository repository;
    private final KafkaTemplate<String, ProductEvent> kafkaTemplate;


    public ProductCommandController(ProductRepository repository, KafkaTemplate<String, ProductEvent> kafkaTemplate) {
        this.repository = repository;
        this.kafkaTemplate = kafkaTemplate;

    }

    @PostMapping
    public ResponseEntity<Product> createProduct(@RequestBody Product product) {
       product =  repository.save(product);
        ProductEvent event = new ProductEvent("ProductCreated", product);
        this.kafkaTemplate.send("products", event);
        return ResponseEntity.ok().body(product);
    }
}
As you notice after we save the product in the above REST method , we send a message to Kafka using the below two lines:
  ProductEvent event = new ProductEvent("ProductCreated", product);
        this.kafkaTemplate.send("products", event);
A kafka template object is already injected through the constructor.
QUERY Changes:
Similar to the “Command” changes add Kafka dependency first.
You don’t need to configure anything in application.properties as Spring automatically registers an Apache Kafka consumer and it listens on localhost:9092 by default.
Create “ProductEvent” class just like in Command microservice. This represents the event Kafka will be receiving.
In the Query Controller make the below changes:
package com.cqrs.query.demo;

import java.util.List;
import java.util.concurrent.ConcurrentHashMap;
import java.util.concurrent.ConcurrentMap;
import java.util.stream.Collectors;

import org.apache.kafka.clients.consumer.ConsumerRecord;
import org.apache.kafka.clients.consumer.ConsumerRecords;
import org.springframework.kafka.annotation.KafkaListener;
import org.springframework.web.bind.annotation.GetMapping;
import org.springframework.web.bind.annotation.RequestMapping;
import org.springframework.web.bind.annotation.RestController;

import com.fasterxml.jackson.core.JsonProcessingException;
import com.fasterxml.jackson.databind.JsonMappingException;
import com.fasterxml.jackson.databind.ObjectMapper;

@RestController
@RequestMapping("/products")
public class ProductQueryController {
	private final ProductRepository repository;

	public ProductQueryController(ProductRepository repository) {
		this.repository = repository;
	}

	@KafkaListener(topics = "products", groupId = "products_group")
	public void processProductEvent(String event) {

		System.out.println("Getting event " + event);

		ProductEvent productEvent = null;
		try {
			productEvent = new ObjectMapper().readValue(event, ProductEvent.class);

			System.out.println(productEvent);

			switch (productEvent.getType()) {
			case "ProductCreated":

				this.repository.save(productEvent.getProduct());
				break;

			default:
				break;
			}

		} catch (Exception e) {

			e.printStackTrace();
		}
	}

	@GetMapping
	public List<Product> getProducts() {
		return repository.findAll().stream()

				.collect(Collectors.toList());
	}
}
As you see we have added a listener method annotated by @KafkaListener.
This listens to events sent by Kafka running on localhost and port 9092.
And then retrieves that event, extracts the product out of it and stores in a repository exclusive to “Query” microservice.
But before that you need to set up Kafka.
Setting up Kafka:
Now let’s set up Kafka and get it running.
To do this follow the below post:
How to install and set up Apache Kafka on Windows 10? – The Full Stack Developer
You need to run Apache Zookeper and Apache Kafka as explained in the above post.
Test Synchronization:
Now let’s test our synchronization changes.
Start both the “Command” and “Query” microservices.
Let’s add two products from “Command” microservice running at port 8080.


Now let’s query these products through “Query” microservice deployed in port 8081:

We got both the products from Query microservice’s own database.
We can check the logs and verify that we got the events from Kafka:

Advantages:
Let’s summarize the advantages again:
- Scalability:
You can scale your read data separately if your application gets enormous number of read requests compared to write requests. You can deploy additional instances of your Query microservice.
2. Independent data schema:
Since we are using a separate database for read and write logic you can design your database in each microservice according to your business use cases. If you want to store additional data in your read database so that you can serve complex queries you can do that while reading events from Kafka.
3. Security:
You can employ additional security to your “Command” microservice if required. Maybe you can deploy that in a private VPN and make only admin users add new products.
Disadvantages:
- Consistency:
Since there is a synchronization logic between the command and query parts, data won’t be consistent immediately. But it will be consistent eventually. So, if your application is time critical like a banking application you should not go with CQRS. If your use cases are fine with eventual consistency though you can go with CQRS.
2. Complexity:
CQRS includes some additional logic compared to a traditional CRUD (Create-Read-Update-Delete) app. This increases its complexity.
3. Messaging:
To keep read and write data in sync we use a messaging solution like Apache Kafka. So we need to handle message failures and duplicate messages to make the application more robust.
Further Notes:
The above demo is just one way of implementing CQRS.
You can do that in many more ways based on your use case.
- If you don’t want two separate microservices and separate databases but just want to keep the command logic and query logic separate you can do that within a single microservice with different Controller, Service and Repository classes for command and query respectively.
- You can use Event Sourcing to keep the read and write data in sync between the Command and Query microservices.
- You can use a NoSQL database for your read system instead of a relational database since you can keep unstructured data in NoSQL database which can serve read queries better.
Github links:
Command microservice :
vijaysrj/commandCQRS (github.com)
Query microservice:
vijaysrj/queryCQRS (github.com)
Check out other microservices design patterns here:
Leave a Reply